söndag 29 december 2013

A "Less is more" Happy Birthday Card

Hello!

Well, my mojo has disappeared and I blame Santa.. ;) I have tried making a card just for fun today, and this is what I came up with. One thing that I LOVE about Spellbinders dies, are all the possibilities you have with them.. I bought these Spellbinders Majestic Labels 25 a while ago, but haven't had the chance to use them until now. I am pretty happy with the result, sometimes Less is More :)

Here's my card, hope you like it :) The text is in Swedish and means "Hurrah on your birthday" and the stamp is from Roxstamps.


That's all for today, happy crafting! :)

xoxo

torsdag 26 december 2013

Gumnut Curly Top (DT Make it Crafty)

Hello girls and boys, how's your crafting going??
Mine is going well, still(!!!) and I have another DT card for you this week :) I have used this fabulous stamp - Gumnut Curly Top and I have had a lot of fun making this card as I think you can see ;)

Here's my card!


Here's a close-up at the gorgeous MiC stamp! I have coloured her with Distress Ink pads and stamped with Magnolia Post card stamps around the image. You can also see the fence that is cut with Magnolia DooHickey Fence die and coloured with Inka Gold Rose Quartz.


This is a sign I made of paper clay from Panduro Hobby. I stamped the text with a Roxstamps stamp and when dry, I coloured it with Inka Gold Hydragea. :) The text says (in Swedish): "Forgive quickly, kiss slowly, love long, laugh a lot, and never regret anything that made you feel alive!" I love this stamp and it's a lot of fun making these signs :)
The butterfly down in the corner is cut with a die from Memorybox and coloured with Inka Gold Rose Quartz.


A final photo!


Hope you liked it, this stamp is lovely and I really enjoyed colouring her :)
Happy crafting all!

xoxo Madeleine

söndag 22 december 2013

Girl with glass slipper (DT Make it Crafty)

Well hello there!
How you doing? I am kind of exhausted and soooo proud of what I have achieved today. This DT card was a HUGE challenge for me and I am sooo proud but also surprised of how it turned out, I mean, did I colour this!??? Yeah, I am pretty shocked. I have spent about 7-8 hours finishing this stamp and I have used Distress Ink pads to colour it with. I printed this digi with almost no lines, to use the noline colouring technique and to be honest.. I have only coloured with this technique TWICE before! And then I at least had visible lines, some of them on this stamp disappeared completely :D 

So, yes, I am very proud of this image and I do not see myself as a very good colourer, although I know I got some skills, so if you think you can't do it, think again. If I can do it, you can too!! 

This is my card! I put on some Frantage Enamel Shabby White around the image.


Now I dare you to try the noline colouring technique with one of Make it Crafty's gorgeous digi stamps! :)

Happy crafting!
xoxo Madeleine

fredag 20 december 2013

Fairy Tree House (DT Make it Crafty)

Hello hello!

I have created a scene with two digi stamps from Make it Crafty and I must say - this tree house is fabulous!! And so much colouring :D The stamps' names are Fairy Tree House and Gnomey Peter.

Here's my card! I have coloured it with Distress Ink pads and I tried a new technique, making the shading better - I used a little black and the current colour and then I used the current colour again, over it. So easy and so effective! :)


Yeah, only one photo today, I'll be back soon with another DT card for you! December isn't over yet! ;)

Happy Crafting!
xoxo Madeleine

torsdag 19 december 2013

Under the sea scene (DT MiC)


Hello again!
Today's DT card is a great scene I have put together with several stamps! These are the ones I have used: Chubby Seahorse, Cute SeahorseSiren of Pearls, Siren Lorelei, Coral Sea Floor, Shipwreck, and then I have used fishes, shells, starfish and coral from this package. 

Here's my card!! I have coloured the whole scene with Distress Ink pads and also used Inka Gold Rose Quartz and Hydragea so make the pink and purple parts shimmer. I have also used a Pearl-maker to define bubbles in 3D on the scene :) 


This scene was crazy fun to colour and I bet you would love to do it too! I started off colouring the background, the water and the sand, and the shipwreck and then I coloured the sirens and at last the rest of the scene.

I hope that you will try out these gorgeous stamps in one way or another!

Happy Crafting! :)
xoxo Madeleine

tisdag 17 december 2013

Christine Soprano in a book card (DT MiC)

Hello there! How ya doing ey? :D

This card has been lying on my crafting space for about a month now.. I waited for the mojo to come, and as you all know by now, it has finally appeared!! :D So now I have coloured her, this gorgeous stamp called Christine Soprano! I have made a book card, with a confusing tutorial, so I will not link to it, because the instructions said one thing, and the photos another :) WARNING for a lot of pictures! :D

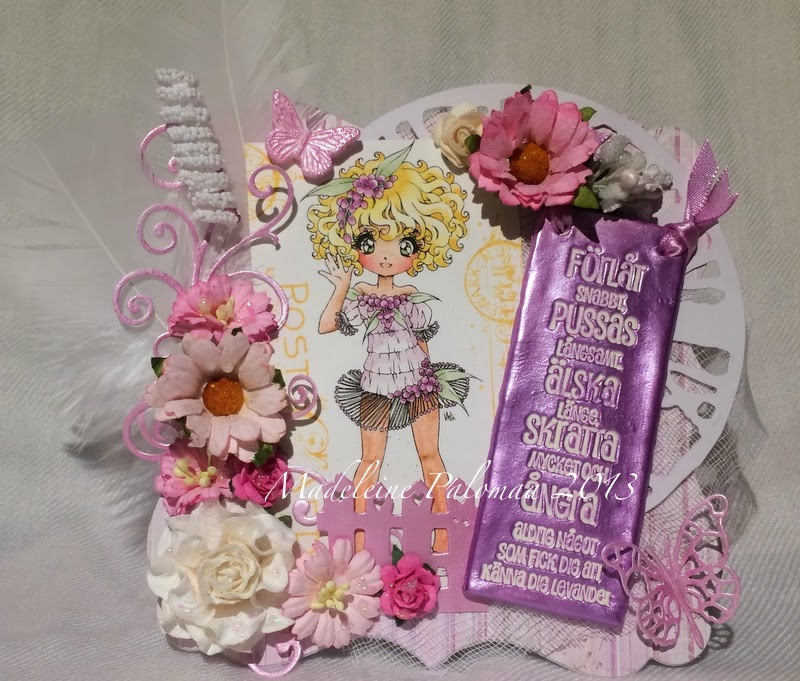
Here's my card! The flowers are bought from Wild Orchid Crafts and the butterfly charm is coloured with Inka Gold Rose Quartz :)


I had A LOT of fun colouring this stamp, because I did something different.. yeah, you might know it by now, I coloured with Distress Ink pads as always, and theeen... then I used Inka Gold Rose Quartz on her, yeah I went a little nuts, so she's very shimmery haha! But I love shimmer, it's the best thing ever!!


I bought new molds from Martha Stewart and this cute butterfly is made of Martha Stewart's AWESOME clay! I love it because it's kind of rubbish when it's dry and that is so good comparing to Panduro's paper clay I've used before, because that's heavier (A LOT heavier!) and breaks easily when dry, so now I am hooked on MS clay! I have inked this gorgeous butterfly with Inka Gold Rose Quartz!


Here's a close-up at one of the flower arrangements, I made these leafs in MS clay and coloured them with Bundle Sage Distress Ink and then put on a liiiittle Inka Gold Platinum to make it shimmer.


Here's a photo of the book card, as you can see there are several "book pages" (not real though ;) ). I have inked the edges with Vintage Photo Distress Ink pads. The design paper is from a gorgeous paper pad that I've forgotten the name of!


Another photo, from above.. :)


And here's the inside! The butterflies are from a Martha Stewart punch (Medium) and I have coloured them with Inka Gold Rose Quartz ;)


Inside I have put 8 candles into a cellophane bag and just tied a knot. :)


That's all I had to inspire you today, I relaly hope you try this stamp out, those pleats are so much fun to colour!!!

Happy crafting!

xoxo Madeleine

söndag 15 december 2013

Fairest of all princess (DT Make it Crafty)

Hello to all the happy crafters out there! :)

Today's DT card is a very special card to me. This is actually my 70th card!!!! :D I started off making cards in late February this year and I can't believe it myself, 70 cards in about 10 months! Wow I am amazed myself, where did I find the time to make all of these!? :D

For this card I have used a beautiful stamp called "Fairest of all princess" from Make it Crafty and if you want to practise folds, you should definitely try this stamp out! 

This is my card!


And this is Fairest of all princess digi stamp! I have coloured her with Distress Ink pads, and this time I tried something new, when I researched on how to colour shadows to make a more intense look, that when applied on her folds, became awesome! It works like this: you take a dry brush, take some dark colour, brownish or as I did, black, and take off any needless colour, and then you carefully brush the colour next to the lines. I used black and that made the folds look a little more shadowed.
I have also used Frantage Enamel Shabby Pink around her and inked the edges with Dusty Concord Distress Ink.


As you can see I have used a couple of dies for this card, here's one I love most of all! The Magnolia DooHickey Castle die is perfect for princess cards :) I have inked it with Spun Sugar Distress Ink and Dusty Concord Distress Ink and then used Inka Gold Rose Quartz and Hydragea over the pink and purple parts. I did the same with the Magnolia DooHickey Heart tag to the right and the Heart swirl in the bottom of this picture.


I have purchased a lovely fabric that you just rip off pieces from and make these easy bows out of.


Here's a close-up on the butterfly in Martha Stewart Clay I have made, I have coloured it with Inka Gold Old Silver to make it shimmer like this :)


A close-up at the flower arrangement. You can also see a part of the Magnolia DooHickey Fence here too. You can also see a Tim Holtz die here, Weathered clock die, that I have inked with Dusty Concord Distress Ink in the edges.


Here's a close-up at the glass bottle that is filled with something mysteriously hehe ;) And you can also see a butterfly made of Martha Stewart Clay and coloured the same way as the big one before.


A final photo..


That's what I had to inspire you with today, would love to see some of your Fairest of all princess digi stamp coloured up! :D

Happy crafting people!!
xoxo Madeleine

fredag 13 december 2013

Felicity in pink and purple (DT Make it Crafty)

Hello everyone!
Today's DT card is a bit crazy... INKA GOLD CRAZY! :D Yeah, I have my mojo going as strong as my new muscles I am building at the gym hahaha, and I gotta use it to get creative you know, so today's card includes a LOT of Inka Gold. :) I have used this gorgeous stamp from Make it Crafty: Felicity

Here's my card! I have used Go Kreate Large Frame Frilly #2 for the card shape and K Design's design paper. I have used several Magnolia Doohickey dies for this card: Peacock Feathers, Peonies, Heart Swirl and Lovely Fence. I have also used a butterfly die from Memorybox (don't remember the name though). 


Here's Felicity :) I have coloured her with Distress Ink pads and stamped next to her with Magnolia Post card stamps and with Vintage Photo Distress Ink.


A flower made with Magnolia DooHickey Peonies. I cut it out in white paper, coloured it with Milled Lavender and then painted Inka Gold Rose Quartz over to make it shimmer! As you can see I have cut out a Magnolia DooHickey Heart Swirl and coloured it with Seedless Preserves and painted with Inka Gold Hydragea.


Here's a close-up at both the Magnolia DooHickey Peacock Feathers, a bottle that I've filled with crystal glitter and a piece of Magnolia Fence and also a Memorybox butterfly. :) I've coloured the peacock feathers with Picked Raspberry Distress Ink pad and then I painted Inka Gold Rose Quartz over it. The fence is only painted with Inka Gold Platinum and the butterfly is coloured with Milled Lavender Distress Ink and then painted with Rose Quartz as well.


Here's a close-up at the butterfly of clay (Martha Stewart's wooonderful clay!) that I have painted Rose Quartz on too.


Well, that's all I had to inspire you with today, I would love to see your creations with this gorgeous stamp :)

Happy crafting people!
xoxo Madeleine

onsdag 11 december 2013

A summer scene in wintertimes (DT MiC)

Heeelllooooo people!
I still have my MOJO going strong and I spent yesterday colouring about FIVE different projects, how productive am I!? :D As you may know, there's a new DT call for Make it Crafty, and my and the other girl's time is running out, so I am doing the best of the little time I have left on the fabulous team :)

Today I want to show you a scene I am very proud of, where I have used several stamps! These are the stamps I have used: Sitting Annalise, The Ivy Swing, Sitting Flower and Petals and Palings! Yep, that was 4 different stamps! :)

This is my card!
I saw a couple of cards that had this gorgeous shape and I thought it was a huge card shape die, but hey, I found out it was a punch from Martha Stewart - THERE'S a reason why I love Martha Stewart products!! They are truly made FOR crafters :) so, that's how I made the card shape for this card. The papers are from Maja Design, the green one is from Vintage Spring Basic and the barred is from the Sofiero collection.


The butterflies are cut with a Martha Stewart punch and I have used Inka gold Rose Quartz on them so they would shimmer.


I have coloured it with Distress Ink pads and I also used Inka Gold Hydragea on Annalise's dress and the purple flowers, and Rose Quartz on the flowers on the bough and on the big flower on Annalises head!


I hope you liked the card, I fell in love with the scene and will definitely do this one again! :)
Happy crafting all!

xoxo Madeleine

måndag 9 december 2013

Angelica in Flight (DT MiC)

Howdydodi!? :D Hahaha...
Hello everyone! Today's DT card for Make it Crafty is with such a gorgeous stamp called Angelica in Flight! I have tried something new with this stamp, I coloured it as usual with Distress Ink pads, but then I tried painting with a medium called Inka Gold! It's a shimmery paste that you can use on several things like charms, paper and other things I haven't tried out yet ;) I painted her wings and dress with two different Inka Golds, Platinum for the wings and Rose Quartz for her dress.

Here's my card! I have used Go Kreate Frilly #5 dies for the card shape and Maja Design's Vintage Frost Basic paper.


Here's a close-up at Angelica.. I have coloured her with Distress Ink pads and put on Frantage Enamel Shabby White around the image. I have also used Gold stickles around the edges.

Distress Ink pads and Inka Golds used:
Hair: Scattered Straw, Vintage Photo, Walnut Stain
Face and skin: Tattered Rose, Vintage Photo
Dress: Milled Lavender and Inka Gold Rose Quartz
Wings: Inka Gold Platinum


I had already made this frame of clay from Martha Stewart in plum purple, so I put on a lot of Inka Gold Rose Quartz to tone it down a little and now it fits but it's its own at the same time! I love how shiny it got :) I have used silver coloured stickers and wrote "Thank you" in Swedish and used Crackle Accent on it. The butterflies on the card are cut with a punch from Martha Stewart. I painted Inka Gold Rose Quartz on them too! I bought my Inka Golds here.


Here's my flower arrangement! All of it comes from Wild Orchid Crafts, love the tulips and spiral stamens, and oh well, I love them all!! :D I put some crystal stickles on the flowers. The butterflies are cut with a punch from Martha Stewart and I painted them with Inka Gold Rose quartz too :)


This is my inspiration for you today, hope you're having a lovely day with crafting ;)

xoxo Madeleine

söndag 8 december 2013

A Tea Light Card (DT MiC)

Hello everyone!
I have a special DT card for you today, with a gorgeous Make it Crafty stamp called Gumnut Flower Girl. I love her, she looks so pretty and cool at the same time :) I made a Thank you card with this stamp, with Maja Design papers and a new folding I haven't tried out before, a Tea Light Card! I used this tutorial to make it. Very easy and very beautiful to give away!

This is my card... The frame is made of clay from Martha Stewart, I had actually already made it of this colour, so the only thing I did with this frame was to paint Inka Gold Platinum on it to make it shimmer :) I have also used Crackle Accent on it!


I have coloured the stamp with Distress Ink pads and I also put on some Inka Gold Rose Quartz on the flowers in the image.

Distress Ink pads used:
Hair: Scattered Straw, Vintage Photo, Walnut Stain
Face and skin: Tattered Rose, Vintage Photo, Worn Lipstick
Dress and leaves: Bundled Sage
Flowers: Picked Raspberry


All the flowers are from Wild Orchid Crafts, I finally found these gorgeous spiral stamens and I LOVE them! Also I have been longing for the gorgeous Chrysantemum flowers and now I finally have them! I put on Crystal stickles on all the flowers. I have also found love in those berry stamens, they're so beautiful! The butterfly charm is also painted with Inka Gold Rose Quartz :)


Here you can see how it looks from the side!


And opened! You make the box separately from the card so it's incredibly easy! The papers are from the Sofiero paper Collection of Maja Design, love them! I cut the whole in the gift box with a die from Spellbinders Nestabilities Opulent Ovals and I put scented candles in the gift box.


That's all I had to show you today, please try out this gorgeous stamp and the card folding too! I had a lot of fun making this card :)

Have a lovely Sunday all!

xoxo Madeleine

fredag 6 december 2013

A Christmas scene (DT Make it Crafty)


Hello!
Christmas is upon us and today I want to show you a DT card for Make it Crafty that took me some time to finish! I made a Christmas scene with three stamps: Bethany Winter Jacket, Fairy Gift and Cold by light. This was a tough one, but I made it with few mistakes haha :) This scene is also inspiration for the Easy colour challenge over at www.makeitcolourful.com, where you're supposed to use green and red :) 

This is the card! This is very unique to be one of my cards, no embellishments and only the image to focus at! :) I made this scene with what hopefully is a little sense of humor.. :) Bethany is pointing at the Fairy who is hanging from a Christmas tree! :) The papers come from First Edition's Silent Night. 


That's all I had to show today! It is very challenging colouring a scene like this, but I dare you to try it out, because you learn a lot on the way!

Take care
xoxo Madeleine

onsdag 4 december 2013

Elves swinging... (DT Make it Crafty)


Hello everyone!
Today's DT card is a Christmas one, with Make it Crafty's new digi stamp "Elves swinging on baubles" :) It was fun to colour this stamp, and this card is made and inspired by a sketch I found at milolilja.net :)

Here's my card!


Here's the stamped image! I have coloured it with Distress Ink pads and used Frantage Enamel Shabby White around the stamped image and finally I put on some Platinum Stickles around the edges. The text "Merry Christmas" is stamped with a Magnolia stamp.


Here's the inside! All the papers come from a paper pad called First Edition Silent Night. The little white square is cut with a Spellbinders Nestabilities Majestic Elements Opulent Ovals.


That's what I had to show you today, I hope your Christmas card making are going well, have a little looksie at www.makeitcrafty.com if you want to find some fine digi stamps! ;)

Thanks for stopping by, take care!
xoxo Madeleine