torsdag 28 november 2013

A Magic Card, Thank you! (DT MiC)

Hello!!

Today's DT card for Make it Crafty is a new folding - Magic card that I tried out using this great tutorial. I used the gorgeous papers from the Papermania "Summer bloom" collection, one of my favourite paper collections! The stamp I chose for this card is beautiful Pearl from Make it Crafty, that you can find here!

This is my card! I have fell in love with the clay frames that I make with molds from Martha Stewart, it's just such a beautiful embellishment on cards! This one I have coloured with Inka Gold Rose so it's a bit shiny too. I used letter stickers to write "Thank you" in Swedish and put on some Crackle Accent. The butterflies are cut with a Martha Stewart punch (a favourite of mine!) and coloured with Inka Gold Rose as well. The laced edges are cut with a Martha Stewart punch as well.


Here she is, Pearl! I have coloured her with Distress Ink Pads and used Frantage Enamel Shabby Pink around the image. The oval is cut with one of my new dies, Spellbinders Nestabilities Majestic Elements Opulent Ovals! I love them :)

Distress Ink pads used:
Hair: Scattered Straw
Face and skin: Tattered Rose, Worn Lipstick
Dress and mask: Spun Sugar
Feathers: Black Sooth


Here you can see more of the card folding, how it's built! The tutorial above is great, I can really recommend it :)


Here's the back of the front of the card, I have cut out a butterfly with Spellbinders Wonderful Wings and coloured it with Inka Gold Rose!


Here's the inside. I cut out and embossed a frame with Spellbinders Nestabilities Decorative Elements Gold Labels Four, to write your greetings on.


I hope you try out this folding, it's fun and easy and I hope you liked gorgeous Pearl too ;)

Take care!
xoxo
onsdag 27 november 2013

North Pole Tilda Christmas card - round 2!


 Hey everyone!!
Today I want to show you my second Christmas card with North Pole Tilda! I love this stamp and hope to do a couple more cards with her before Christmas! :P

This is my card! 


This is Tilda, I have coloured her with a Distress Marker and Distress Ink pads. I have used Frantage Enamel Shabby White around the image and put on some Platinum stickles around the edges of the stamped image.

Distress Markers used:
Hat, jacket and shoes: Picked Raspberry

Distress Ink pads used:
Hair: Squeezed Lemon, Scattered Straw, Wild Honey
Trousers and gloves: Seedless Preserves
Face: Vintage Photo, Tattered Rose, Worn Lipstick


This is a decoration I made with the new Vintage Frost Basics papers from Maja Design! I cut out a little Santa Claus, glued it on to a glass cabochons with Glossy Accent, and then I glued it together with the charm. Easy! ;)


Here's my new Magnolia dies, Peacock Feathers that I just love, they're so gorgeous! Below it, I have put on a frame of clay from Martha Stewart that I have used letter stickers and then put on Crackle Accent.


Here's the Magnolia Heart tag, that I cut out with another piece of Maja Design's Vintage Frost Basic paper. I have used two winter charms, a snowflake to the left and a Christmas tree to the right :) The paper snowflake is cut with a Martha Stewart punch and I have put on some Crystal stickles.


All the flowers and berries are from WOC and the swirl to the right is a die from Craft-Too.


Ooops! I almost forgot! I have used Go Kreate's GORGEOUS card shaping dies for this card, Go Kreate Large Frame Frilly #5. It's one of my new favourite dies :D

That's all for this time, thanks for stopping by!
xoxo Madeleine

måndag 25 november 2013

An easel drawer box card (DT Make it Crafty)


Hello again!
This DT card is a very special card to me. I have been developing this card during a month now I think and I've finally finished it :) It's a very fun folding, an easel drawer box card, super simple!! I used this tutorial to make it. :) The stamp for this DT card is called Tiny Lina and you can find her here!

Here's my easel drawer box card!


And here it is standing up.


Here's a photo from the side so you can see how it's built.


Here's Tiny Lina, isn't it a gorgeous stamp!? I fell in love with her the moment I found her. :) I have coloured her with Distress Ink Pads and for the dress I used my very first Distress Marker, Picked Raspberry! The nuance between the pad and marker actually differed, so I am very pleased with my purchase of it and might buy more of them.. :) I have made a corner of paperclay from Panduro and I used Platinum stickles on all the edges on the card and also Frantage Enamel Shabby Pink around the image :) The sign in the lower right corner is made with clay from Martha Stewart and I have used Glossy accent over the paper sign. All the flowers are from WOC and I have put on some Crystal stickles on them.

Distress Inks used:
Hair: Squeezed Lemon, Scattered Straw
Skin: Tattered Rose, Peack Feathers (the eyes)
Dress: Picked Raspberry Distress Marker
Butterfly: Mowed Lawn, Seedless Preserves, Picked Raspberry Distress Marker


This is how the box looks when the drawer is drawn out! I have used Marianne Design papers on the card and in the drawer. The button on the drawer is from WOC as well. The square in front of the front is cut and embossed with Spellbinders Nestabilities Labels Seventeen.


And here's the back!


I truly hope to inspire you to try out this very easy folding and this goooorgeous stamp from Make it Crafty, I will be using this one a lot!! :)

Take care!
xoxo Madeleine

onsdag 20 november 2013

Fluttering Sapphire Fairy card (DT Make it Crafty)

Hi everyone!
Today I want to show you a very simple but yet elegant card, that I made with the Spellbinders Nestabilities Majestic Elements Radiant Rectangles and this month's 1 dollar digi stamp from Make it Crafty: Fluttering Sapphire Fairy. I made the card base with the dies from Spellbinders and used a design paper (I don't remember where I got it from or which brand it is) on some of the parts. Also, I hope to inspire you to try out this month's colour challenge - skin and muscle definition over at www.makeitcolourful.com

Here's the card! I used a great birthday stamp from Roxstamps that I just love - it says "Hurray on your birthday!" 


I coloured her with Distress Ink pads, and used Diamond stickles on her wings. Around the image I have put on some Frantage Enamel Shabby Pink.

Distress Ink pads used:
Hair: Squeezed Lemon, Scattered Straw, Wild Honey
Skin: Tattered Rose, Vintage Photo (Great for muscle definition it turns out!!) and Worn Lipstick on her cheeks
Eyes: Peacock Feathers
Clothes and wings: Milled Lavender


Here's the inside, I kept it quite simple but used the Spellbinders dies here as well.


Some of the Spellbinders are just great to do simple cards with and sometimes those cards don't even benefit from using a lot of decorations - the dies make the card! 

I know a lot of US feared the new colour challenge this month, but really dare to try it and join the fun in the Make it Crafty Facebook group! And don't forget to buy your Fairy digi for just 1 dollar! (You'll have to join the Facebook group to get the code)

Have a lovely evening!
xoxo Madeleine

tisdag 19 november 2013

Big Bob's little gift (DT Make it Crafty)


Hello Everyone!

Today's DT card is made with a new stamp "Big Bob's little gift" from Make it Crafty that I just LOOOVE! He's like a man's man and it was kind of funny to make a very "strong" "masculine" card with him.. This DT card is hopefully an inspiration for those of you who want to enter this month's sketch challenge at the Make it Crafty group on Facebook. This is the sketch... :) and I have stretch it a little, so I would love to see your interpretations on this sketch :) 

... And here's the card! I have used the new winter papers "Cold Winter" from K Designs on the whole card. I recently bought the gorgeous "Post Card"-stamps from Magnolia and this is the first card I used them on, it's already some of my favourite stamps!! The text "God Jul" means Merry Christmas in Swedish and are cut with a die from Roxstamps!


Here's the man of the men, Big Bob :) I have coloured him with Distress Ink Pads and chalked the edges with Vintage Photo Distress Ink.

Hair: Squeezed Lemon, Scattered Straw, Wild Honey
Skin: Tattered Rose
Shirt: Barn Door
Trousers: Chipped Sapphire
Shoes: Black Sooth
Gift: Squeezed Lemon, Scattered Straw, Deep Forest


Here's a close-up at the snowflake from Joy of Craft. I have used a little Diamond stickles on it and I glued a stone on it.


I really hope you try out this gorgeous sketch and enter this month's sketch challenge!
Take care! :)

xoxo Madeleine

torsdag 14 november 2013

A book card (DT MiC)


Hey Everyone!
How you doing? I've been out for a little while, but now I'm back with a new and to me, very exciting project for this weeks DT inspiration for Make it Crafty! Today I want to show you my very first book card! This is one of the most fun and exciting projects I have done so far, you can even make more of the book pages and make it a good present box. I just made my first one, but am already working on another, with more space within it. ;) You'll see in a couple of weeks!

Anyway, here's my book card! As you can see I used Chantelle at the Races digi stamp for it, which you can find here


Here she is, Chantelle at the Races. I have coloured her with Distress Ink pads and played around with gel- and glitterpens on parts of her. On the flowers on her dress and the hat I used a pink gel pen and then a glitter pen and her shoes are glittered with a glitterpen. I have put on Platinum stickles around the image and used Frantage Enamel Shabby white on it. I also chalked the edges with Vintage Photo Distress Ink.

Distress Inks:
Hat and dress: Spun Sugar, Worn Lipstick Scattered Straw (Feathers)
Face and skin: Scattered Straw, Spun Sugar, Squeezed Lemon, Worn Lipstick
Hair: Squeezed Lemon, Scattered Straw, Wild Honey


Here's flowers from WOC, I put on a little Diamond stickles and painted a little white acrylic paint on them. The swirl is from Craft-Too.


A close up at the other flowers.. As you can see I have used gauze behind the image and decorations. The little butterfly charm is bought from China and the ribbon is from Slöjd-detaljer.


Here's a close-up at the Magnolia heart tag I made out of Maja Designs Sofiero Collection. The key charm and sentiment charms is also from China. I've put on some acrylic on them as well. The ribbon I think I have gotten in a swap i participated in. Here you can also see a corner made of clay, the mold and clay are from Martha Stewart.


Here's a close-up at the congratulation sign. The frame is made with a mold from Martha Stewart and the letters are stickers I bought on Kreatima in Stockholm. I've also put on a lot of Crackle Accent on the frame.


Now you can see it's a book card! :) I have only used papers from Maja Designs Sofiero Collection on the whole card.


I want to give cred to Stämpelkällan for the great tutorial of this book card, you can find it here. It's in English too, so you can all try it out! :)


Here's the inside! I have cut out and embossed the frame inside with Spellbinders Nestabilities Gold Labels Four. The butterflies are made with a punch from Martha Stewart and the same paper from Maja Designs Sofiero Collection as on the Magnolia heart tag.


I have used a Martha Stewart Doily Lace punch to make the frame of the pages. I also chalked all the edges on the whole card with Vintage Photo Distress Ink. The text is a stamp from Roxstamps and I stamped with Picked Raspberry Distress Ink and covered it with some Perfect Pearl powder to make the text shimmer. The text says something like this (in Swedish):

"Forgive fast
Kiss slowly
Love long
Laugh a lot
and never regret
something that made you feel alive!"


The back of the card..


That's all for now, I really hope you try out this tutorial and make a book card of your own.. Imagine to get one of these on your birthday, or as a thank you.. hmm, maybe I will do a thank you book card next time... ;)

Take care!
xoxo Madeleine
måndag 4 november 2013

North Pole Tilda - A Christmas card


Hi everyone!

Today I am blogging a card that was pretty fun doing. The card grew piece by piece and I was surprised by the colours I chose, how well they match each other! I bought two stamps from the new Magnolia Winter Wonderland Collection 2013 and this is my second stamp, isn't she adorable? :) I have used designpaper from a paperpad called Silent Night (bought it at www.pyhobby.se I think). 


A close-up at the beautiful North Pole Tilda. I have coloured her with Distress Ink pads and played with Frantage Enamel Shabby Pink around the stamped image. Also, I stamped the image with black colour and then embossed it with clear embossing powder. I chalked the edges with some Vintage Photo Distress Ink. I used Frosty Lace stickles on her hat.

Distress colours used:
Hair: Squeezed Lemon, Scattered Straw, Wild Honey
Face and skin: Vintage Photo, Tattered Rose, Worn Lipstick
Clothes: Milled Lavender, Spun Sugar, Black Sooth


A close-up at the beautiful flowers that I made with Spellbinders Nestabilities Layered Poinsettias. I inked them with Milled Lavender Distress Ink and glued a Champagne-coloured pearl into the middle. I also used Diamond stickles on the petals. The leaves are made with a Crafts-Too Holly Die and inked with Vintage Photo Distress Ink. I have also used the new textstamps within the Magnolia Winter Wonderland Collection 2013, that says "A Joyful Christmas".


A close-up at the other side of the card. I bought cute little snowman charms and used one of them on this card.


Here's the inside. I have used Spellbinders Nestabilities Labels Eighteen to make two frames and inked the smaller one with Milled Lavender Distress Ink. The snowflakes are made with a punch from Martha Stewart and chalked at the edges with Vintage Photo Distress Ink.


A final photo of the card. Here you can also see the Memory Box Star Flourish piece, that is sooo beautiful :) I inked it with Milled Lavender Distress Ink and used Diamond stickles on it to really make it shine :)


That's all I had to show today, hope you'll have a great day! :)
xoxo Madeleine

söndag 3 november 2013

A Joyful Tilda - A Christmas card

Hi!

It has been a little while since I made a card and here comes one that I felt fit in on the expression "Less is more" :) I decided to work with sketches and was inspired by the one below (I found it on Pinterest, so if its rightful owner sees this, please comment and I will write the source of it :) ). I love working with two colours and this time I went for pink and plum purple. 

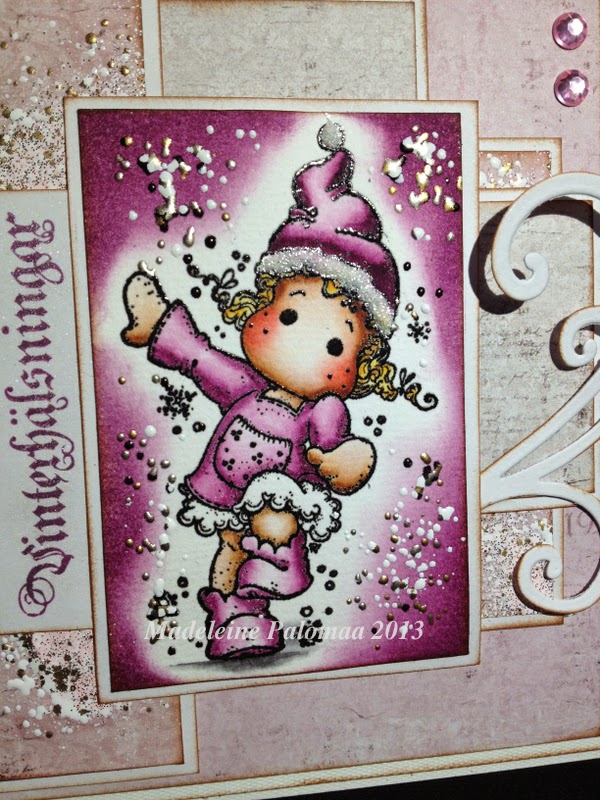
Here's the card! :) I have used papers from Maja Design Vintage Summer Basics and played a little with Frantage Enamel Shabby pink on the pink parts. I have chalked the edges with Vintage Photo Distress Ink Pad. The swirls are made with a new die of mine, from Crafts-Too, I have chalked them with Vintage Photo Distress Ink Pad as well. The text says "Winter greetings" in Swedish and is made with a stamp from Maja Design. I have stamped the text with Seedless Preserves Distress Ink Pad and then put on some Perfect Pearl powder to make it shimmer.


Here's a close-up on A Joyful Tilda. I have actually stamped her with a black permanent dye and then put on some clear embossing powder, used my heating gun to make it melt and voilà - an embossed image! I coloured her with Distress Ink Pads and used Frantage Enamel Aged Wine around the image. I used Frosty Lace stickles on her hat.

Distress colours used on Tilda:
Hair: Squeezed Lemon, Scattered Straw, Wild Honey
Face: Vintage Photo, Tattered Rose, Worn Lipstick
Dress, hat and shoes: Seedless Preserves


Thank you for stopping by, have a great day!
xoxo Madeleine