onsdag 24 februari 2016

Quick Creations DT with Whimsy Stamps E.Bell Shimmery Sprinkles Fairy

Hello!!

It's my turn to share a new DT card for Quick Creations! This time I have used the darling Whimsy stamps Elisabeth Bell Shimmery Sprinkles Fairy. Isn't she the sweetest?!

Copics used:

Hair: E57, 55, 53
Skin: E04, 11, 21, 00, 000, R20
Dress: V09, 17, 15, 12
Wings: BG13, 23, 11, 10
Flowers: RV55, 53


Card recipe:

Materials used from Quick Creations:
La la land Open Hearts Doily Border die

Other materials used:

Cheesecloth
Rose lace
Paper flowers
Spiral stamens
Martha Stewart Butterfly punch
Glass bottle
Frosted berries
Frantage Enamel Shabby White
Gesso

Thank you so much for stopping by!


söndag 21 februari 2016

Bonnie with a new Wee stamps Easter challenge!

Hello everyone!!

I am so happy to see how the Wee stamps World Fans FB group grow and I love seeing all the gorgeous creations made with Sylvia Zets amazing stamps fill the feed in the group!

Last week we announced the winners of the Wee stamps Valentine's challenge and we had so much fun we just had to have another challenge! This time the theme will be the up and coming Easter holiday! I love Easter, not only for the Easter eggs, but for the feeling of that spring is finally coming soon! Although the holiday is quite early this year, it won't matter, because spring will be in my heart lol!

I have created a little inspirational card with the new and fabulous stamp called Bonnie, available in both rubber stamp (via Whimsystamps) and digital stamp (via Weestamps). I coloured the image with my beloved Copics and used some of the techniques shown in the free Sunset Background class released by the amazing online colouring class company Kit and Clowder! I love how the clouds turned more natural and adding the white posca pen (an acrylic pen) in the grass gave a beautiful effect!

Copics used:

Banner: E08, Y17, 15, 11, 000
Sky: C3,1, Blender, B00, 000, 0000
Grass: G99, 94, 21, YG67, 63, 03
Flowers: Pink RV69, 55, 52 Purple V09, 06, 04, 01, 000 Yellow Y17, 15, 11
Leaves: G99, 94, 21
Bonnie: Black 100, C7, 5, 3, 1 Pink R85, 83, 81
Hat: BG09, 49, 15, 23, 11, 10, Y11, RV69, 66, 63
Wood basket: E59, 57, 55, 53, 37, 35, 33


So the new challenge is on and we would love to see your creations in the FB group!

Happy Crafting!

xoxo Madeleine

fredag 12 februari 2016

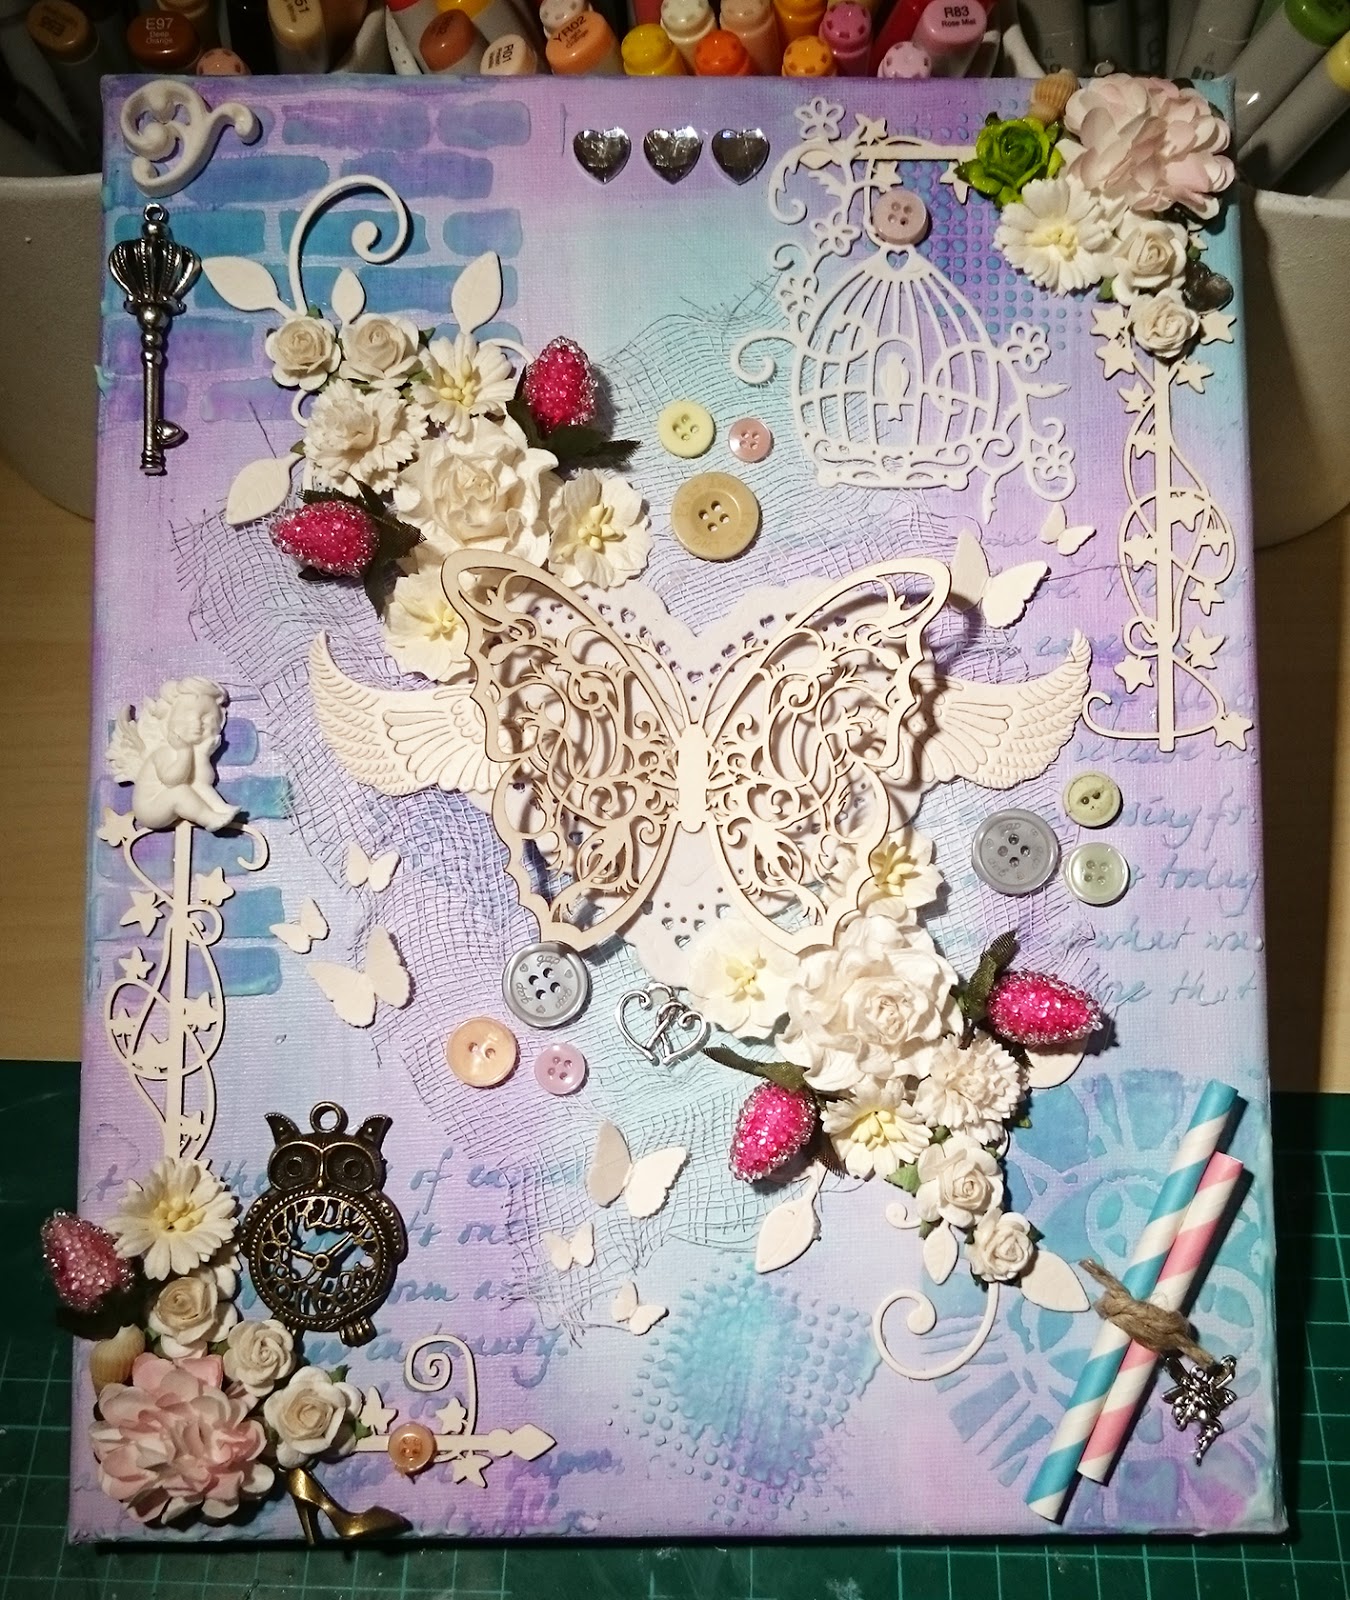
A colourful mixed media canvas Scrapkonst

Hello everyone!

I am so excited to share this piece of art with you today! I have been working on this for a while now, and now it's finally done! 

I will tell you how I did this piece of art further down in this blog post.
Here's the canvas!


So I started painting the whole canvas with gesso and when it had dried, I took some Dylusions Ink and blended it with white acrylic paint. After that I played around with some fun stencils and modeling paste. As you can see the modeling paste actually made the colours shine through the paint. 

Then I started working with the layout and I used some dies to cut som beautiful shapes out of chipboard sheets, foam sheets and then I started arranging everything. After arranging most of the embellishments I started gluing everything down to the canvas, using heated glue.


When everything was glued to the canvas I covered it all with gesso and started blending my mists! I used Dylusions Inks for this canvas, I took new spray bottles and filled them with some of the inks I wanted for blues and purple, (Turquoise and Fuschia and Crushed Grape) and then I poured some white Dylusions Ink into the bottles. I gave them a shook and then I started misting the canvas! I had to do it twice since I didn't cover everything up. To soften the two layers of colours (they turned out pretty intense in the end which I didn't want!) I sprayed on some Dylusions Ink Bubblegum blended with the White Dylusions Ink and then I also found Tattered Angels Mint Chocolate Chip in my stash and used the to turn the colours lighter and more greenish. It's a very pastelly green and it blended perfect with my home made turquoise blue spray!!


When it all had dried up, I sprayed on Perfect Pearl mist over the whole canvas. When dry I played around with some Glossy Accent here and there and then Crystal stickles. I covered some of the areas with some more gesso to high light the different embellishments. I also used some rhinestones to make it more interesting on the chipboards in the corners.


This is only my second mixed media canvas I have made and it was so fun! Definitely one of my favourite kinds of art! :D 

Happy crafting everyone!

xoxo Madeleine

onsdag 3 februari 2016

Quick Creations DT with The Greeting Farm Anya Princess shabby card!

Hellooo!

It's my favourite time of the month: Time for a new DT card for Quick Creations! :D 
Today I have a shabby chic card with a gorgeous stamp by The Greeting Farm to share with you! I LOVE the Anya rubberstamps, they are just amazing to work with!

Copics used:
Hair: E57, 55, 53
Skin: E04, 11, 21, 00, 000, R22, 20
Dress and crown Pink: RV69, 09, 06, 04, 02, 000 Purple: V09, 17, 15, 05, 12, 01
Posca pen for white sparkling dots!


Products from Quick Creations
The Greeting Farm Princess Anya #4 rubberstamp
Prima Marketing Princess Collection design paper (my FAVOURITE!)
Lalaland Heart Ribbon Corner die

Other materials used:
Cardstock
Copics
Paper flowers
Cheese cloth
Paper doily
Lace
Frosted berries
Stickles Crystal
Gesso
Distress Ink Vintage Photo
Spiral stamens
Martha Stewart clay and mold for bird and butterfly
Inka Gold Rosequartz for the clay embellishments
A ballerina charm
Frantage Enamel Shabby White


Thank you so much for stopping by!
Happy crafting :)

xoxo Madeleine

måndag 25 januari 2016

Quick Creations DT Whimsy stamps Wee stamps Wee Suzi

Hi!

Today is my second blog day at the Quick Creations Design Team and today I have another one of the lovely Wee stamps Whimsy stamps to show you guys! Meet Suzi, isn't she absolutely adorable!! I was so excited to colour up her dress and totally love the effect I got with my new Posca marker (an acrylic paint marker). I decided to make a summer background for this image too and I must say that this is one of the best parts with colouring - the endless possibilities! 

This is my project!

Copics used:
Hair: E29, 25, 55
Skin: E04, 11, 21, 00, 000, R22, 20
Dress: Purple: V09, 06, 04, 01 White: C3, 1, Blender/0
Present: V09, 17, 15, 12, 01, RV69, 55, 52, 00
Flowers: Pink: RV69, 55, 52 Green: G99, 94, 21
Sky and clouds: B00, 000, 0000, C3, 1, Blender/0
Grass: G99, 94, 21, YG67, 63
Ladybug: RV29, 25, 21


Quick Creations product used:
Wee stamps Whimsy stamps Suzi rubber stamp
Trimcraft Floral Pavilion design paper
Lalaland Crafts Scalloped banner die
Paper Doily

Other materials used:
Copics
Lace
Cheery Lynn Flourish Leaf Strip die
Paper flowers
Butterflies made with Martha stewart punch
Charms
Buttons
Crystal Brads
Frosted berries
Roxstamps Ticket die and stamp

Thank you so much for stopping by and checking this post out!

xoxo Madeleine


måndag 11 januari 2016

Quick Creations DT with Dolly Wee stamps Whimsy stamps card


Hi and hello everyone!

I am so happy to tell you some BIG news! I am actually a regular at the Quick Creations Design Team from January 2016! Can you believe it?? :D I am so excited, since I have been a guest during the fall of 2015 and now my journey with Quick Creations will continue, how fun!

I am kicking my DT spot off with a new Whimsy stamp, called Dolly by Wee stamps! I loved her the first time I saw her and I am so happy to share this image and card with you today! I have coloured her with Copics and this time I decided to colour in a background as well!

Copics used:
Skin: E04, 11, 21, 00, 000 R22, 20
Hair: E57, 55, 53
Blue outfit: BG09, 07, 05, 01, 000
Pink outfit: RV69, 55, 52, 00
Purple outfit: V09, 17,15, 12, 01
Black: 100, C9, 7, 5, 3, 1
Pink flowers: RV55, 52, 00, 000
Purple flowers: V15, 12, 01
Sky and clouds: B00, 000, 0000, C3, 1, 0
Grass: G99, 94, 21, YG67, 63


Materials used for Quick Creations:
Doily paper

Card recipe:
Design paper
Lace
Cheese cloth
Paper flowers
Leafy die by Cheery Lynn
Clay corner
Handmade cabochon
Marianne Design Alphabet stamp and die set
Pink straws
Stickles Crystal


Thank you so much for stopping by!!
Happy crafting!

xoxo Madeleine


måndag 4 januari 2016

Wee Stamps Peggy pastel card


Hi everyone!

Today I am sharing a new card with one of my earlier colourings of Wee Stamps Peggy! I coloured her up with Copics and made a summer background, totally love the outcome!

I have played around with my Inka Gold and went treasure hunting among my dies and found a couple of once I rarely or never have been using, so I hade some fun with them as well!

Copics used:
Skin: E04, 11, 21, 00, 000, R22, 20
Hair: E57, 53, 51
Blue: BG09, 07, 05, 01, 000
Pink: RV69, 55, 52, 00
Bird: G99, 94, 21
Grass: G99, 94, 21, YG67, 63, 61
Sky: B00, 000, 0000 C3, 1, 0


Card recipe:

BoBunny Madeleine design papers
Hessian
Cheese cloth
Heart paper doily
Lace
Heart lace with glued on pearl trim
Cheery Lynn Flourish Leaf Strip die
Marianne Design Clock die
Lalaland Crafts Heart Banner die
Butterfly die (don't know the brand)
Paper flowers
Frosted berries
Spiral stamens
Metal charms
Butterflies made of Martha Stewart clay and molds
Inka Gold RoseQuartz
Inka Gold Mint Green
Inklingz H20 Blue
Crystal Stickles
Gesso
Perfect Pearl Shimmer mist to finish the project!

Thank you so much for stopping by!

xoxo Madeleine

tisdag 29 december 2015

Wee stamps Iris Shabby rainbow card

Hellooo everyone!

Hope you all had a lovely Christmas, I sure did! Not much time to craft though, but tonight I found some time and created this card! I coloured up this beautiful stamp by Wee Stamps called Iris a while ago and now I decided to make a light and colourful card with her after making so much Christmas related cards and crafts! I love how it turned out and hope you like it too :)

Copics used:
Hair: E57, 55, 53
Skin: E04, 11, 21, 00, 000, R20
Purple outfit: V09, 06, 04, 01
Aqua outfit: BG18, 15, 11, 10
Wings: B99, 97, 95, 93, 91
Scarf: E18, 15, Y17, 15, 11
Posca pen for white dots


Card recipe:

Wee stamps Iris digistamp
Copics
Crafts and me design paper
Magnolia Heart Swirl die
Marianne Designs Craftables Clock die
Cottage Cutz Balloon die
Lace
Cheesecloth
Inka Gold
Frantage Enamel Shabby White
Marianne Designs Collectables stamps Vintage Alphabet COL1380
Memento Ink Gray
Heart rhinestones
Paper flowers
Berries
Charm
Butterfly made of Martha Stewart clay and mold
Stickles Crystal
Gesso
Shimmer spray

Thank you so much for stopping by!
Happy crafting!

xoxo Madeleine

söndag 20 december 2015

A Christmas gift box


Hello!

Today I am sharing a little Christmas gift box! It's triangular and perfect for putting chocolate in and is a very appreciated gift for someone you care about!

Here's my box! I used Waiting for Christmas Graphic 45 design paper and some embellishments from Wild Orchid crafts and Martha Stewart.


Thank you so much for stopping by!
Happy crafting :)

xoxo Madeleine


tisdag 15 december 2015

An altered candle Christmas angels

Hello!

I am back with a new project, an altered candle! I made it as a Christmas gift for some loved ones and I think this is such a luxury gift when you wrap it with cellophane! 

I found a lovely napkin in my storage and used that one for this project. I made decoupage with a heat gun and the top layer of a napkin and just melt the napkin into the candle. After melting it into the candle I decorated the bottom of the candle, so that you can use it properly :)


Thank you so much for stopping by in my blog and happy crafting!

xoxo Madeleine

An altered candle with Santa Claus!

Hi and hello!

Today I am sharing a new project I made as a Christmas gift for a loved one. I loved making this one, making decoupage with napkins and heat gun is just so much fun!!

I found a lovely napkin in my storage and used that one for this project. I made decoupage with a heat gun and the top layer of a napkin and just melt the napkin into the candle. I melted it into the candle and then I decorated the bottom of the candle, so that you can use it properly :)


Thank you so much for stopping by and happy crafting!

xoxo Madeleine

Santa claus altered candle

Hi!

Today I am sharing a new altered candle that I made as a gift for loved ones this Christmas. :)

I found a lovely napkin in my storage and used that one for this project. I made decoupage with a heat gun and the top layer of a napkin and just melt the napkin into the candle. I melted it into the candle and then I decorated the bottom of the candle, so that you can use it properly :)


Thank you so much for stopping by, happy crafting!

xoxo Madeleine

An altered Christmas candle with Santa Claus

Hi!

One of my favourite things to make and give to someone is an altered candle. It's personal and I put in effort and time into it and the recipient can actually use it! :)

I found a lovely napkin in my storage and used that one for this project. I made decoupage with a heat gun and the top layer of a napkin and just melt the napkin into the candle. I used a GoKreate Frilly die to make the shape of the napkin image before I melted it into the candle. Then I decorated the bottom of the candle, so that you can use it properly :)


 Thank you so much for stopping by and happy crafting!

xoxo Madeleine


A Graphic 45 Christmas card!


Hello!!

Today I am sharing a new Christmas card I have made this year. I love playing around with Spellbinders Nestabilities dies and make cards like these and I had some left over design papers from another project and I really wanted to use it so I made this card with that!


Card recipe:
Graphic 45 12 days til Christmas design paper
White cardstock
Spellbinders Nestabilities Timeless Rectangles dies
Vildastamps Merry Christmas sentiment stamp
Martha Stewart snowflake punch
Shimmer spray

Thank you so much for stopping by and happy crafting! :)

xoxo Madeleine

måndag 14 december 2015

A green Graphic 45 Christmas card!

Hi everyone!

I have made another Christmas card, I can NOT believe this! I have made several Christmas card this year and I have had so much fun!! 

This is my card!

Copics used: 
Hair: E29, 25, 21
Skin: E04, 11, 21, 00, 000, R20 
Red: RV29, 25, 23, 21
Green: G99, 94, 21
Birds: E15, Y17, 15, 11, G99, 94, 21


Card recipe:
Graphic 45 12 days til Christmas design paper
Spellbinders Nestabilities Layered Poinsettia die set
Spellbinders Nestabilities Labels Forty Decorative Elements dies
Martha Stewart Branch punch
Cheese cloth
Heart doily
Hessian
Lace
Frantage Enamel Shabby white
Handmade cabochon with design paper by Maja Design (Vintage Frost)
Apple decoration
Gesso
Red berries
Vilda Stamps Merry Christmas stamp


Thank you so much for taking the time and interest in visiting my blog!
Happy Craftin'!

xoxo Madeleine

söndag 13 december 2015

An altered Christmas flowerpot

Hello again!

I have been crafting again! This time I decided to alter a flowerpot and put some of my favourite Christmas flowers in it, hyacinths! I painted the pot that was brownish from the beginning, white with gesso and white acrylic paint. Then I used some napkins and made decoupage on it. I also used a mod podge with lots and lots of Crystal glitter to make it Christmassy :)
Then I put a green ribbon around it and decorated the Hyacinths with bog moss and some Christmas baubles. I also put some small mushrooms in it. 

This was a gift for someone special and I wrapped it in cellophane which gives such a luxury feeling! :D


Thank you so much for stopping by!

xoxo Madeleine

torsdag 10 december 2015

A blue deer Christmas card


Hi and hello!

Today I am sharing a new Christmas card, made with an image I found in an Etsy store! Loved the idea of not colouring all my holiday images but to just print them out! Awesome!

Here's my card!


Card recipe:
Bobunny design papers
Cheese cloth
Heart doily
Laces
Paper flowers
Martha Stewart snowflake punch
White berry
Light blue and green berries
Snowflake charm
Gesso
Crystal Stickles
Handmade cabochon with Maja Design paper (Vintage Frost)
Magnolia Merry Christmas stamp

Thank you so much for stopping by in my blog today!
Happy Craftin'!

xoxo Madeleine

måndag 7 december 2015

A purple deer Christmas card

Hi!!

I am back with a new Christmas card, this time i purple, black and blue! I had a blast making this one and it was fun to not use the traditional holiday colours :)

This is my card!


Card recipe:
Bobunny design paper
Cheese cloth
Heart doily
Lace
Spellbinders nestabilities Stately Circles
Paper flowers
Purple berry
Spiral stamens
Martha Stewart snowflake punch
Vilda stamps Merry Christmas stamp

Happy to have had you as a visitor here on my blog!
Happy craftin' peeps!

xoxo Madeleine


tisdag 1 december 2015

GDT Quick Creations TGF Flutter Anya Christmas card

Hi!

Today I am sharing a new Christmas card as a Guest with the Quick Creations DT! I have used such a lovely stamp by The Greeting Farm, called Flutter Anya. Isn't she sooo cute?! :D

I have also used Wild Rose Studio design paper called Festive Wishes. Aren't they gorgeous for a Christmas card?!

Copics used:
Hair: E57, 55, 53
Skin: E04, 11, 21, 00, 000, R22, 20
Dress: R59, 46, 27, 22
Wings: BG09, 07, 05, 01, 000


Card recipe:
Wild Rose Studio Festive Wishes design papers
The Greeting Farm Flutter Anya rubberstamp
Copics
Lace
Cheese cloth
Lalaland Heart corner die
Paper flowers
Red berries
Magnolia Christmas stamp
Crystal Heart brads
Martha Stewart Snowflake Punch

Thank you so much for stopping by!

Happy Crafting!
xoxo Madeleine

onsdag 25 november 2015

GDT Quick Creations Saturated Canary Piper Shabby card

Hi and hello!

I am back as a Guest with Quick Creations DT and this time I am showing you a card I made with the gorgeous stamp Piper by Saturated Canary! She was a blast to colour and I totally loved making this card with the gorgeous Prima Princess papers as well!

Copics used: Hair: E29, 25, 21
Purple outfit: V09, 06, 04, 01
Blue outfit: BG09, 05, 01, 000
Brush: RV69, 55, 52


Card recipe:
Prima Princess design papers
Saturated Canary Piper Rubberstamp
Copics
Lalaland Mannequin die
Lace
Cheese cloth
Spellbinders Little Darlings Rubberstamps Lovely View die
Paper flowers
Distress Ink Seedless Preserves
Stempelglede Vintage Garden stamp set

Thank you so much for stopping by!

Happy crafting!
xoxo Madeleine